Giới thiệu
Như chúng ta đã biết trong bài trước, các thành phần trên một giao diện người dùng (UI – User Interface), như các điều khiển (controls), muốn hiển thị đến người dùng thì cần phải được chứa trong một layout. Layout là các lớp cho phép chúng ta sắp xếp và hiển thị các thành phần trên giao diện đến người dùng theo cách chúng ta mong muốn. Xamarin.Forms cung cấp nhiều layout và trong bài này chúng ta sẽ tìm hiểu:
- StackLayout
- Grid
- AbsoluteLayout
- RelativeLayout
- ScrollView
- Frame
- ContentView
Layouts trong Xamarin.Forms
Trong Xamarin.Forms chúng ta có thể tạo các layouts trong giao diện người dùng theo hai cách: dùng XAML và mã C#. Để đơn giản, chúng ta sẽ tạo một ứng dụng mới tên LayoutsApp với UI chứa hai điều khiển: một Label và một Button.
StackLayout
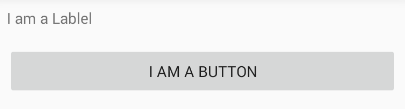
StackLayout là layout cho phép chúng ta đặt các điều khiển cạnh nhau theo chiều ngang (horizontally) hay theo chiều dọc (vertically). Đoạn mã XAML trong tập tin MainPage.xaml sau minh họa cách chúng ta thêm hai điều khiển Label và Button đến StackLayout:
<StackLayout Orientation="Vertical" Margin="5">

<Label Text="I am a Lablel" Margin="5"/>

<Button Text="I am a Button" Margin="5"/>

</StackLayout>
Đoạn mã XAML trên tương đương với đoạn mã C# trong tập tin MainPage.xaml.cs như sau:
var layout = new StackLayout();

layout.Orientation = StackOrientation.Vertical;

layout.Margin = 5;

var myLabel = new Label

{

Text = "I am a Label",

Margin = 5

};

var myButton = new Button

{

Text = "I am a Button",

Margin = 5

};

layout.Children.Add(myLabel);

layout.Children.Add(myButton);

Content = layout;
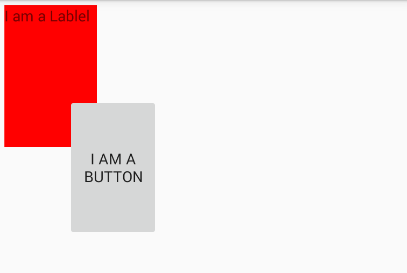
Kết quả thực thi:
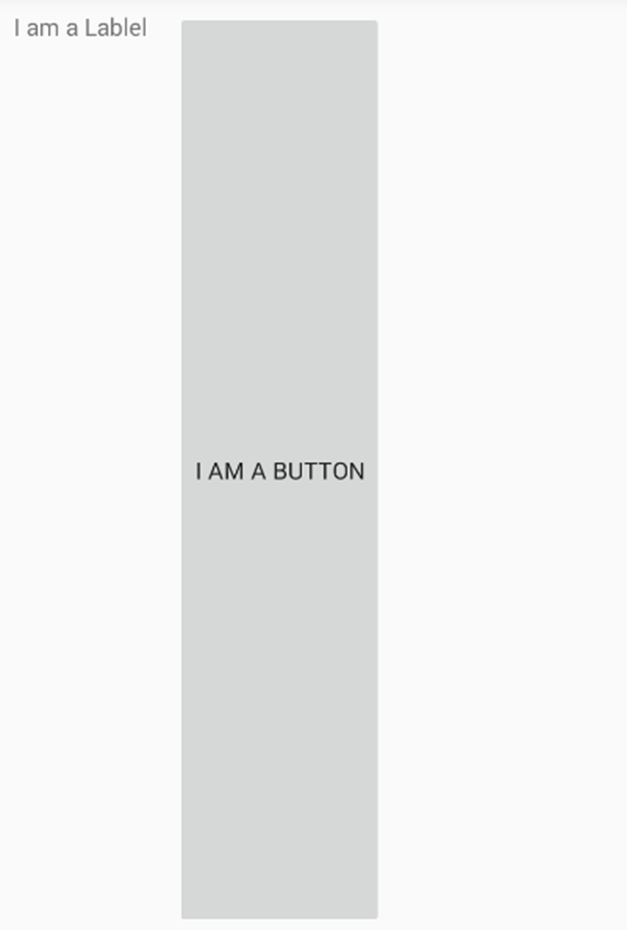
Lưu ý chúng ta chỉ được chọn một trong hai cách. Bây giờ, chúng ta thay đổi giá trị thuộc tính Orientation của StackLayout trong XAML như sau:
<StackLayout Orientation="Horizontal" Margin="5">

<Label Text="I am a Lablel" Margin="5"/>

<Button Text="I am a Button" Margin="5"/>

</StackLayout>
Đoạn mã C# tương đương:
var layout = new StackLayout();

layout.Orientation = StackOrientation.Horizontal;

layout.Margin = 5;

var myLabel = new Label

{

Text = "I am a Label",

Margin = 5

};

var myButton = new Button

{

Text = "I am a Button",

Margin = 5

};

layout.Children.Add(myLabel);

layout.Children.Add(myButton);

Content = layout;
Kết quả:
Grid
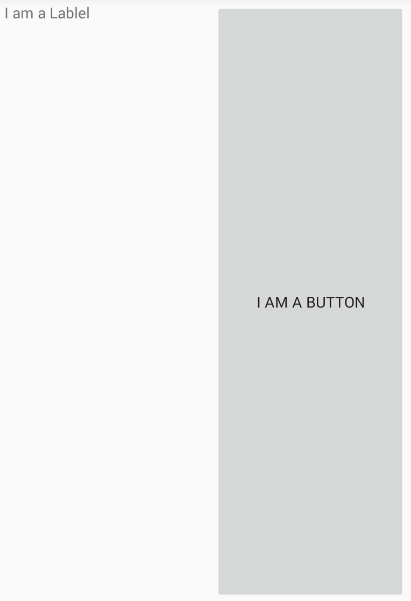
Grid là layout cho phép chúng ta tổ chức các điều khiển theo hàng và cột. Đoạn mã XAML trong tập tin MainPage.xaml sau sẽ thêm hai điều khiển Label và Button đến một Grid một hàng và hai cột:
<!-- one row, two columns-->

<Grid>

<!-- one row -->

<Grid.RowDefinitions>

<RowDefinition />

</Grid.RowDefinitions>

<!-- two columns -->

<Grid.ColumnDefinitions>

<ColumnDefinition />

<ColumnDefinition />

</Grid.ColumnDefinitions>

<!-- Grid.Row="0" and Grid.Column="0" can be omitted -->

<Label Text="I am a Lablel" Margin="5"/>

<Button Grid.Column="1" Text="I am a Button" Margin="5"/>

</Grid>
Nếu dùng mã C# trong tập tin MainPage.xaml.cs:
// create a new grid

var grid = new Grid();

// define one row

grid.RowDefinitions.Add(new RowDefinition {  });

//define two columns

grid.ColumnDefinitions.Add(new ColumnDefinition { });

grid.ColumnDefinitions.Add(new ColumnDefinition {  });

var myLabel = new Label

{

Text = "I am a Label",

Margin = 5,

};

var myButton = new Button

{

Text = "I am a Button",

Margin = 5

};

//adding controls to grid

// Grid.Row = 0 Grid.Column = 0

grid.Children.Add(myLabel,0,0);

// Grid.Row = 0 Grid.Column = 1

grid.Children.Add(myButton,1,0);

Content = grid;
Kết quả:
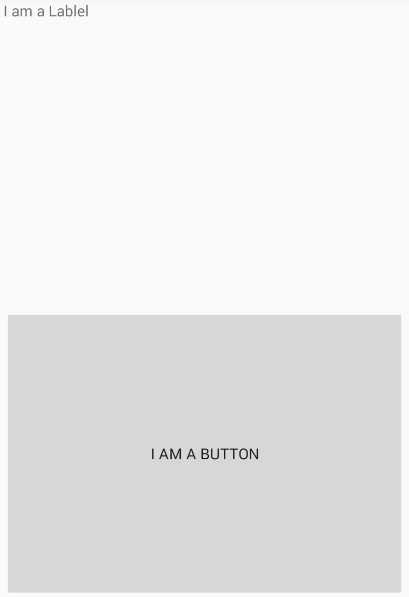
Chúng ta cũng có thể định nghĩa Grid hai hàng và một cột trong XAML:
<!-- two rows, one column-->

<Grid>

<!-- two rows -->

<Grid.RowDefinitions>

<RowDefinition />

<RowDefinition />

</Grid.RowDefinitions>

<!-- one column -->

<Grid.ColumnDefinitions>

<ColumnDefinition />

</Grid.ColumnDefinitions>

<!-- Grid.Row="0" and Grid.Column="0" can be omitted -->

<Label Text="I am a Lablel" Margin="5"/>

<Button Grid.Row="1" Text="I am a Button" Margin="5"/>

</Grid>
Đoạn mã C# tương đương:
// create a new grid

var grid = new Grid();

// define two rows

grid.RowDefinitions.Add(new RowDefinition {  });

grid.RowDefinitions.Add(new RowDefinition { });

//define one column

grid.ColumnDefinitions.Add(new ColumnDefinition { });


var myLabel = new Label

{

Text = "I am a Label",

Margin = 5,

};

var myButton = new Button

{

Text = "I am a Button",

Margin = 5

};

//adding controls to grid

// Grid.Row = 0 Grid.Column = 0

grid.Children.Add(myLabel,0,0);

// Grid.Row = 1 Grid.Column = 0

grid.Children.Add(myButton,0,1);

Content = grid;
Kết quả:
AbsoluteLayout
AbsoluteLayout cho phép chúng ta xác định chính xác vị trí và phạm vi mà chúng ta muốn các điều khiển hiển thị. Đoạn mã XAML trong tập tin MainPage.xaml sau định nghĩa AbsoluteLayout chứa Label tại vị trí có tọa độ (0,0), chiều cao (height) là 0.25, và chiều rộng (width) là 0.25; Button tại vị trí có tọa độ (0.20,0.20), chiều cao là 0.25, và chiều rộng là 0.25:
<AbsoluteLayout>

<!--x:0 y:0 Width:0.25 Height:0.25 -->

<Label Text="I am a Lablel" Margin="5" BackgroundColor="Red" AbsoluteLayout.LayoutBounds="0, 0, 0.25, 0.25"

AbsoluteLayout.LayoutFlags="All"/>

<!--x:0.20 y:0.20 Width:0.25 Height:0.25 -->

<Button Text="I am a Button" Margin="5" AbsoluteLayout.LayoutBounds="0.20, 0.20, 0.25, 0.25"

AbsoluteLayout.LayoutFlags="All" />


</AbsoluteLayout>
Đoạn mã C# trong tập tin MainPage.xaml.cs tương ứng:
//create a new layout

var layout = new AbsoluteLayout();


var myLabel = new Label

{

Text = "I am a Label",

Margin = 5,

BackgroundColor = Color.Red

};

var myButton = new Button

{

Text = "I am a Button",

Margin = 5

};

//adding controls to AbsoluteLayout


AbsoluteLayout.SetLayoutBounds(myLabel, new Rectangle(0, 0, 0.25, 0.25));

AbsoluteLayout.SetLayoutFlags(myLabel, AbsoluteLayoutFlags.All);

AbsoluteLayout.SetLayoutBounds(myButton, new Rectangle(0.20, 0.20, 0.25, 0.25));

AbsoluteLayout.SetLayoutFlags(myButton, AbsoluteLayoutFlags.All);


layout.Children.Add(myLabel);

layout.Children.Add(myButton);


Content = layout;
Kết quả:
RelativeLayout
RelativeLayout cho phép xác định vị trí tương đối giữa các điều khiển hay giữa các điều khiển con với điều khiển cha. . Đoạn mã XAML trong tập tin MainPage.xaml xác định vị trí của điều khiển cha (Label) với điều khiển con (Button) trong RelativeLayout như sau:
<RelativeLayout>

<Label Text="I am a Lablel" Margin="5" BackgroundColor="Blue"

x:Name="myLabel" RelativeLayout.XConstraint="{ConstraintExpression Type=RelativeToParent,

Property=X,Factor=1,Constant=0}"

RelativeLayout.YConstraint="{ConstraintExpression Type=RelativeToParent,

Property=Y,Factor=.15,Constant=0}"

RelativeLayout.WidthConstraint="{ConstraintExpression Type=RelativeToParent,

Property=Width,Factor=1,Constant=0}"

RelativeLayout.HeightConstraint="{ConstraintExpression Type=RelativeToParent,

Property=Height,Factor=.8,Constant=0}"/>


<Button Text="I am a Button" Margin="5" BackgroundColor="Red"

RelativeLayout.YConstraint="{ConstraintExpression Type=RelativeToView, ElementName=myLabel,

Property=Y,Factor=1,Constant=20}"

RelativeLayout.XConstraint="{ConstraintExpression Type=RelativeToView,ElementName=myLabel,

Property=X,Factor=1,Constant=20}"

RelativeLayout.WidthConstraint="{ConstraintExpression Type=RelativeToParent,

Property=Width,Factor=.5,Constant=0}"

RelativeLayout.HeightConstraint="{ConstraintExpression  Type=RelativeToParent,

Property=Height,Factor=.5,Constant=0}"/>

</RelativeLayout>
Đoạn mã C# trong MainPage.xaml.cs tương ứng:
//create a new layout

var layout = new RelativeLayout();

var myLabel = new Label

{

Text = "I am a Label",

Margin = 5,

BackgroundColor = Color.Blue

};

var myButton = new Button

{

Text = "I am a Button",

Margin = 5,

BackgroundColor = Color.Red

};

//adding controls to RelativeLayout

layout.Children.Add(myLabel, Constraint.RelativeToParent((parent) => {

return parent.X;

}), Constraint.RelativeToParent((parent) => {

return parent.Y * .15;

}), Constraint.RelativeToParent((parent) => {

return parent.Width;

}), Constraint.RelativeToParent((parent) => {

return parent.Height * .8;

}));

layout.Children.Add(myButton, Constraint.RelativeToView(myLabel, (Parent, sibling) => {

return sibling.X + 20;

}), Constraint.RelativeToView(myLabel, (parent, sibling) => {

return sibling.Y + 20;

}), Constraint.RelativeToParent((parent) => {

return parent.Width * .5;

}), Constraint.RelativeToParent((parent) => {

return parent.Height * .5;

}));

Content = layout;
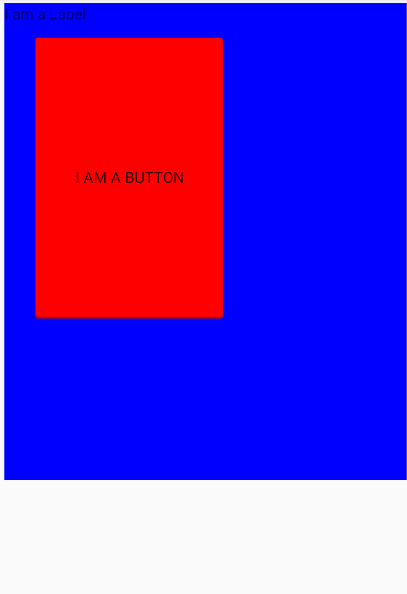
Kết quả:
ScrollView
ScrollView phù hợp cho nội dung bị tràn màn hình. Khi đó, một thanh cuộn sẽ xuất hiện cho phép chúng ta xem nội dung một cách dễ dàng hơn. Đoạn mã XAML trong tập tin MainPage.xaml sau thêm Label đến ScrollView:
<ScrollView>

<Label Text="I am a Lablel" Margin="5" BackgroundColor="Red" HeightRequest="600" WidthRequest="150"/>

</ScrollView>
Đoạn mã C# trong MainPage.xaml.cs tương ứng:
var scroll = new ScrollView();

var myLabel = new Label

{

Text = "I am a Label",

Margin = 5,

BackgroundColor = Color.Red,

HeightRequest=600,

WidthRequest = 150

};

scroll.Content = myLabel;

Content = scroll;
Kết quả:
Chúng ta có thể cuộn nội dung Label lên hay xuống với thanh cuộn bên phải màn hình.
Frame
Frame cho phép chúng ta tạo ra một khung chứa chứa các điều khiển với các đường viền, góc bo tròn, và các khoảng cách giữa các điều khiển phù hợp. Đoạn mã XAML trong tập tin MainPage.xaml tạo một Frame chứa Label:
<Frame OutlineColor="Red" CornerRadius="10" HasShadow="True" Margin="20" >

<Label Text="I am a Lablel" Margin="5" BackgroundColor="Red" HorizontalOptions="Center" VerticalOptions="Center"/>

</Frame>
Đoạn mã C# trong MainPage.xaml.cs tương ứng:
var frame = new Frame();

var myLabel = new Label

{

Text = "I am a Label",

Margin = 5,

BackgroundColor = Color.Red,

HorizontalOptions= LayoutOptions.Center,

VerticalOptions = LayoutOptions.Center

};

frame.Content = myLabel;

frame.OutlineColor = Color.Red;

frame.CornerRadius = 10;

frame.HasShadow = true;

frame.Margin = 20;

Content = frame;
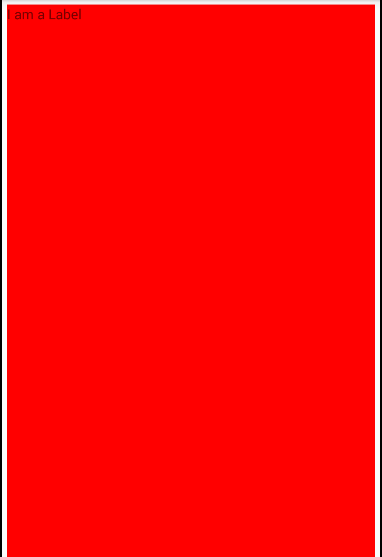
Kết quả:
Chúng ta không nhìn thấy màu đỏ của đường viền. Vấn đề này vượt quá phạm vi của bài viết và sẽ được đề cập trong một bài viết khác. Tuy nhiên, chúng ta có thể tham khảo các giải pháp tại stackoverflow.
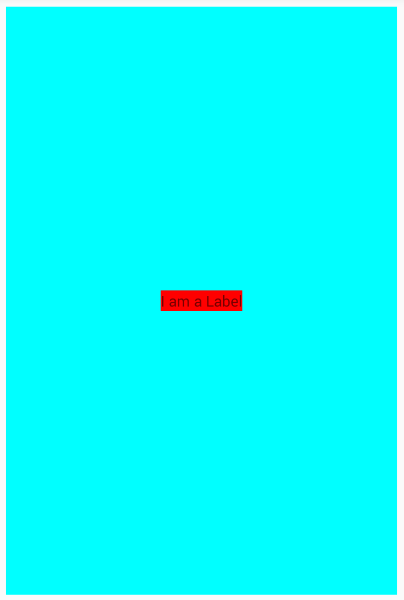
ContentView
ContentView cho phép nhiều khung nhìn chứa trong một khung nhìn và hữu ích cho việc tạo ra các điều khiển tùy chọn và có thể dùng lại. Đoạn mã XAML trong tập tin MainPage.xaml tạo một ContentView chứa Label:
<ContentView BackgroundColor="Aqua" Margin="10" Padding="25">

<Label Text="I am a Label" HorizontalOptions="Center"

VerticalOptions="Center" BackgroundColor="Red"/>

</ContentView>
Đoạn mã C# trong MainPage.xaml.cs tương ứng:
var contentView = new ContentView();

var myLabel = new Label

{

Text = "I am a Label",

BackgroundColor = Color.Red,

HorizontalOptions = LayoutOptions.Center,

VerticalOptions = LayoutOptions.Center

};

contentView.Content = myLabel;

contentView.Padding = 25;

contentView.Margin = 10;

contentView.BackgroundColor = Color.Aqua;

Content = contentView;
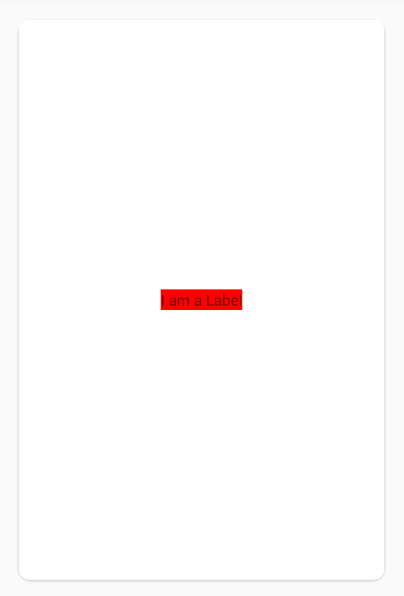
Kết quả:
Chúng ta cũng có thể tạo một template ContentView trong Visual Studio bằng cách vào Add New Item.
Kết luận
Bài viết này giới thiệu cách tạo các layouts cơ bản trong Xamarin.Forms theo hai cách XAML và mã C#. Bài viết tiếp theo chúng ta sẽ tìm hiểu về các điều khiển trong Xamarin.Forms.
Các bài trước:
- Nhập môn Xamarin.Forms cho nhà phát triển Android
- Tạo giao diện người dùng (user interface) trong Xamarin.Forms bằng cách sử dụng XAML
Tham khảo: Microsoft Docs
